
Do you want more than one operating system on your Raspberry Pi? Dual boot is what you need, and BerryBoot is one of the best software for that.
In this guide, I’ll show your how to dual boot Raspberry Pi using the BerryBoot tool so that you can install and use two (or more) operating systems on your Pi. In fact, you can also multi boot Raspberry Pi with this application.
Although the Raspberry Pi foundation gives us an official tool called NOOBS, it lacks several features that the BerryBoot can provide. So, are you ready to try the BerryBoot to dual boot Raspberry Pi 3 or 4? Then without further ado, let’s move on.
Contents
What Does BerryBoot Do?
BerryBoot is nothing but a tool that helps you manage the installation of one or more operating systems on your Raspberry Pi. This tool can come in handy while you face any issues in installing the ISO disc image of any OS too.
So basically, BerryBoot lets you choose from a list of operating systems, download and install it without you having to intervene much. Once you configure everything in the BerryBoot, you can easily choose your desired OS each time you boot your Raspberry Pi.
You might also like: Raspberry Pi Not Booting? Here are 14 Ways to Fix it
Furthermore, it also comes with a few network tools, configuration editor, location settings, etc. The configuration editor is really a nice thing that comes to the rescue if you require modifications in network settings inside the wpa_supplicant.conf file or boot menu timeout settings in cmdline.txt.
Requirements
Steps to Dual Boot Raspberry Pi
Here are the steps you need to perform to dual boot or even multi boot your Raspberry Pi with your favorite operating systems.
Step 1: Download & Copy BerryBoot to an SD Card
- First of all, you need to download BerryBoot from an online repository [Download from here]. If you have a Raspberry Pi 3, 4, or 400, there is a dedicated version available. So make sure to download that.
- Once downloaded successfully, extract the contents in the zip file and copy it to your SD card using your computer.
Make sure to copy the files into the root of your SD card. If you change the location, it won’t work. After completely copying the files to the right location remove the sard safely. Don’t simply pull from the port. Make sure that no processes that use the card are running in the background.
Now insert the card into your Pi and power it up. Make sure that you have a mouse and a keyboard connected correctly before powering up the Pi. This is required for the selection of operating systems in the BerryBoot interface.
Step 2: Configure BerryBoot for Raspberry Pi Dual Boot
The BerryBoot will present you with a configuration screen on your monitor, In this first welcome screen it will ask you to choose a couple of options regarding the video and network connection. For video configuration, choose the option Yes (disable overscan) in case you see green borders at the top and bottom of your screen. otherwise, choose No (enable overscan).
In the network connection configuration, select the type of network connection that you are using. If you use an ethernet connection, select the Wired option. Otherwise, select the Wifi option and then select your Wi-Fi name (SSID) and enter the password.
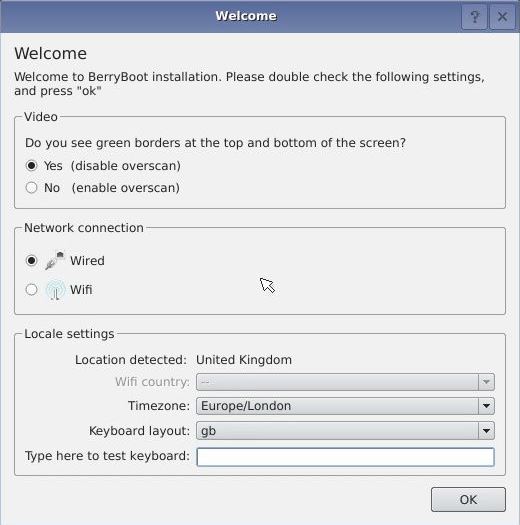
In the final part of Locale settings, choose your Timezone and your preferred Keyboard layout. This is to make sure that the BerryBoot can be connected to the server and the downloading of operating systems is possible without any issues. Click OK once done with that.
Step 3: Install Raspberry Pi Dual Boot Operating Systems
After you complete the above steps you will be presented with another window that lets you select the location where you wanna install the operating systems.
Here you will have obviously the SD card (usually labeled as mmcblk0) and other media like NAS (Network storage), SSD (sda), etc in case you have them.
So, here you need to choose the media for OS installation. In case you need the media to be formatted before installation, click Format and then proceed. The default option for the file system will be ext4. Leave it as such.
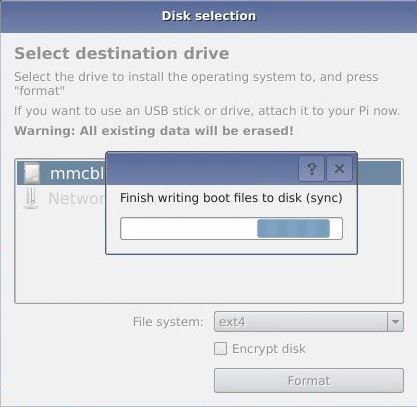
Note: Formatting will erase all your data on the SD card and I highly recommend taking a complete backup of your SD card before proceeding.
Once complete, BerryBoot will show you another window where several operating systems will be listed. So go through the list and decide which OS you are installing.

At this time, you can only install a single operating system. But fret not, you can install multiple OSes after a system reboot.
So choose the first OS and then click OK to install. This will start downloading the OS image file and then it will be written on your SD card (or whatever media you have selected). After the process, your system will reboot.
Once the system reboots, click Edit at the boot menu. You can now start installing as many other operating systems as you need. But make sure that you don’t fill up the storage media. Always leave at least 10-15% of free space on the storage so that you can run the installed OSes without any hang or other issues.
My recommendation is to go up to a maximum of 2 or 3 operating systems at a time.
To install an additional OS follow the below steps:
- Click on Add OS to browse and choose an OS.
- Check the respective boxes for the OSes you need.
- Click OK.
- Now select the OS you want to set as default.
- Click Exit to download and install the OS.
Wait for the installation to complete, this may take a while depending on your internet speed, operating system, and number of OSes, etc.
Step 4: Dual Boot Raspberry Pi
By now you have configured and installed the dual boot operating systems in BerryBoot on your Pi. The next step is to dual boot Raspberry Pi with those OSes.
Once your Raspberry Pi reboots, you will now onwards presented with a boot screen from where you can choose which OS to boot. If you didn’t make any selection within 10 seconds, it will automatically load the default OS that you have set before. For making a manual selection you need a keyboard or mouse. So before powering up your Pi, plug in a keyboard or mouse or both.
Once you land on one of the operating systems you installed, you can switch to a different OS at any time. Just reboot your system and again select the required OS from the boot menu.
That’s it!
Advanced Settings in BerryBoot
As I mentioned before, BerryBoot can offer you some advanced options like configuration editor, boot timeout editor, cloning, backup, etc.
- The Clone option will let you make a copy of any desired OS currently installed on your Pi.
- The Backup option will help you create a full backup of any or all OSes to a separate storage media.
- You can use the Delete option to uninstall an operating system.
- If you navigate to the Advanced configuration settings, you can see there are options to edit files like cmdline.txt, config.txt, wpa_supplicant.conf, etc.
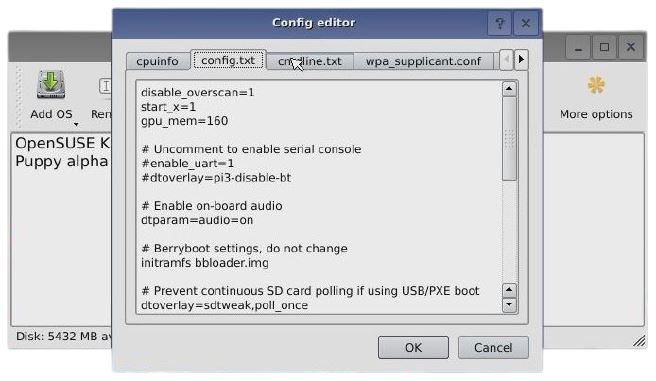
For example, I will show you how to edit the boot menu time-out settings in the cmdline.txt file.
Inside the file, I’m editing the timeout in seconds.
Syntax:
bootmenutimeout=<number of seconds>Example:
bootmenutimeout=12Here I’ve modified the boot menu time-out settings and changed the default 10 seconds to 12 seconds. Now onwards the default OS will be loaded after 12 seconds of inactivity from the user side.
Some other advanced options in BerryBoot includes but not limited to Set password to protect installations, Repair filesystem, etc.
Final Words
Setting up Raspberry Pi dual boot is not that tricky but you need to take a little care while handling your Pi and the storage media. I hope that now you understood how to multi boot Raspberry Pi using the BerryBoot application and if you still have any doubts or feedback, just drop a comment below. I’ll get back to you soon.
Found an issue with this article? Report it here, so that I can resolve it.


You could have mentioned that it is possible to add images from 3rd party sites, in order to install Kali or others.