Raspberry Pi won’t boot? Is your new Raspberry Pi not booting with red or green lights? Here are 14 Raspberry Pi troubleshooting tips for you.
It’s a real headache when your Raspberry Pi goes into trouble. One of the most common issues that come around a Pi is the booting issue. When you get your Pi and all set up to run, it won’t boot. Something is wrong, but what? And how you can troubleshoot this? This is the scenario of many beginners. So today, I decided to write a detailed article to help you get rid of the annoying booting problems.
Contents
- Raspberry Pi Not Booting? Try these
- 1. Raspberry Pi 4 Power Issues
- 2. Raspberry Pi 4 Won’t Boot?
- 3. Raspberry Pi 4 Boots But No Display?
- 4. Raspberry Pi Stuck on Rainbow Screen?
- 5. Check the Red and Green LED Lights
- 6. Check the Power Supply Unit
- 7. Check Whether the OS is Installed
- 8. Check Whether microSD Card is Working
- 9. Is HDMI Output Disabled?
- 10. Check the OS Compatibility
- 12. Check the Cabling
- 13. Poorly Connected Accessories
- 14. Unplug Everything
- Is your Raspberry Pi Dead or Defective? Here’s How to Confirm
- Conclusion
Raspberry Pi Not Booting? Try these
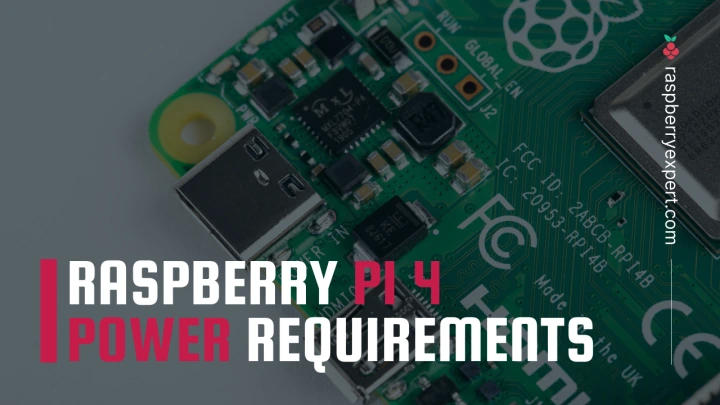
1. Raspberry Pi 4 Power Issues
Unlike other models, Raspberry Pi 4 uses a different kind of Power Supply Unit aka PSU. In RPi 4 the power is fed through a USB C-Type connector from the official power adapter that delivers 5.1V and 3A. The lower models can also work with an ordinary mobile phone charger or Tablet charger. But in the case of Pi 4, you cannot power up using a normal charger. The reason is nothing but the higher power requirement of Pi 4.
So, if this is the case, only you have to do is to replace the normal charger with a better one, preferably the official Raspberry Pi 4 charger. Although it works fine with any charger that can deliver the required input power, it is recommended to stick with the official charger provided by the Raspberry Pi foundation as it is capable of providing stable power input.
2. Raspberry Pi 4 Won’t Boot?
One of the commonest reasons for the Raspberry Pi not booting is the flashing of incompatible OS on the microSD card. Raspberry Pi 4 essentially requires a fresh installation of Raspberry Pi OS. Whatever the OS you are using, the RPi 4 needs a Raspberry Pi OS version that is released after June 2019. Any older version just won’t work.
So, if you are using an older version, remove that and use a fresh installation of the OS on your SD card. This may help you resolve the booting issue with your Pi.
Furthermore, an incompatible OS can also trigger this issue. Your Pi just won’t boot if the OS flashed on your microSD card is not compatible with it. So make sure that you are using a stable version released post-June 2019.
3. Raspberry Pi 4 Boots But No Display?
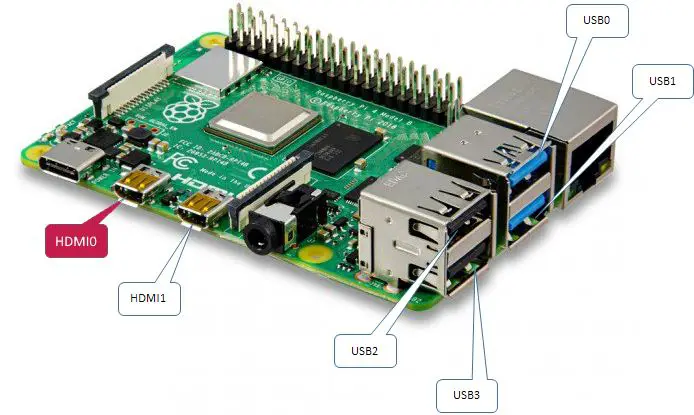
Are you facing Raspberry Pi 4 display issues with red light and nothing on screen? Most probably the issue might be due to the connection of the HDMI cable to the wrong port.
The Raspberry Pi 4 has 2 micro HDMI ports named HDMI0 and HDMI1. Swapping the ports will lead to a booting issue and your Pi won’t display anything. So make sure that your monitor/ display is connected to the HDMI0 port which is located on the left-hand side. Just refer to the below-given image for a better understanding.
4. Raspberry Pi Stuck on Rainbow Screen?
If you are stuck on the Rainbow screen, it implies that your system is not compatible with your Raspberry Pi model.
Your screen normally will flash quickly on booting and then the OS starts to boot. If you are having compatibility issues with the sd card you will see a rainbow screen that will look somewhat like this:

For getting rid of this issue, you need to check that the OS is compatible with your model of Raspberry Pi. If you have an older model of Pi with you, try booting it with this SD card. If this works, you can upgrade the operating system to the latest stable version and try it on your recent Pi.
5. Check the Red and Green LED Lights
For a Raspberry Pi, there are several LED indications to convey some status to the user. Whenever a Pi boot up, one or more LED lights will be activated. One will be a red LED and the other will be green. While the Red LED indicates the power the green indicates the activity.
So, what do these LEDs indicate? When a Raspberry Pi runs in normal mode, both the LEDs will be activated meaning power and activity are ok. And, the green LED will flash during an sd card activity.
Now, you need to understand one thing. What does it indicate when the red LED keeps blinking? It conveys nothing but there the power is dropping below 4.65V. Also, if the Red light doesn’t light up, it means that there is no power at all.
Moreover, if only the red light is active and not blinking, then the Pi is getting enough power. In this condition, if the green light is not active, it means that there is something wrong with the SD card.
When the Raspberry Pi boots from an SD card, the green light should have an irregular blinking pattern. But, it can blink in a more stabilized manner to indicate different kinds of problems. We can identify the problems by observing the number of flashes. With the below-given table, you can identify the problem with your Pi. (Note that the below codes are not valid for Raspberry Pi 4)
| Blinking Pattern | Meaning |
| 3 flashes | start.elf not found |
| 4 flashes | start.elf not launch-able (corrupt) or card not inserted properly/ slot not working |
| 7 flashes | kernel.img not found |
| 8 flashes | SDRAM not recognized. Here, SDRAM may be damaged or bootcode.bin or start.elf is unreadable. |
6. Check the Power Supply Unit
For a Raspberry Pi to read the SD card and boot from it, enough power is required. Failing to provide the same will cause your Pi to fail. It may show issues like hanging, switching off, or simply won’t boot. So the remedy is that you need to use a PSU (Power Supply Unit) that can provide a stable power supply to the Pi.
To make sure that your PSU is good enough, check it with the power requirements of your Raspberry Pi model. Also, try to power your Pi with your mobile phone charger. It’s a bad idea.
Moreover, the Raspberry Pi has a resettable fuse. The fault may be due to a halfway-blown polyfuse. So trying to boot several times simply won’t work. Wait for at least 2 days so that it can reset itself. In the meantime, you can shop for a suitable power supply unit for your Raspberry Pi. Try CanaKit’s Power Adapters on Amazon.
7. Check Whether the OS is Installed
Your Raspberry Pi simply won’t boot if there is no operating system installed on the boot media. Whatever storage media you use, either a microSD card or a USB SSD, you need to install an operating system properly on it.
8. Check Whether microSD Card is Working
If you are using a microSD card, then the booting and running of OS are dependent on it. If you have issues with your card, your Pi will refuse to boot.
So, start the troubleshooting by checking the working of the SD card. Simply shutdown your Pi and remove the card. Plug it into your computer and test whether it is working fine or not. Try formatting the card with a reliable flash drive formatting tool like SDFormatter (Windows and Mac supported). In case it fails to format, then your card is corrupted.
So get a new SD card with higher write speeds (Class A1 or A2 recommended) and install the latest version of the operating system. In case you are using an old sd card, format it properly before installing an OS.
If you are interested you can read my article that explains how to backup your SD card before formatting.
Only buy SD cards from reputable manufacturers. I personally prefer SanDisk microSD cards.
9. Is HDMI Output Disabled?
Since there is no onboard BIOS on your Raspberry Pi, it cannot display any video output without an SD card. So you need to use a working HDMI cable.
While using an HDMI cable with your Pi, both of them should be mutually capable of detecting each other. But in case the HDMI cable is working fine and still, your Pi doesn’t detect it you will need to force HDMI detection.
You can do this on your computer. Just plug the sd card into your computer and navigate to the /boot/ partition. Then open the boot-config.txt file and add the following code at the end.
hdmi_force_hotplug=1Once you modify the file save it. Then insert it back into your Pi and power up.
10. Check the OS Compatibility
As this is a common reason for the booting problem, you need to check the compatibility of the OS with your Pi model. As the Raspberry Pi runs with an ARM-based processor, you can only run an OS compatible with that. So before installing an OS, make sure that it’s available for Raspberry Pi.
If you have a Raspberry Pi 400 or 4, some operating systems are still not available. Also, the latest version might be needed to work without any issues.
11. Are the Files on SD Card Corrupted?
Your Raspberry Pi will refuse to boot in some case of corrupted files on an SD card. In general, there are a couple of reasons for arising a corrupted file issue.
The first reason is nothing but an improper shutdown of the Pi. Most of the time, this might be the issue for beginners as they don’t halt the Pi in a proper way. The proper way of shutting down the Pi is to use one of the following commands.
sudo haltsudo shutdownUsing any one of the above commands is the only official way to shut down the Pi.
Note: There is no difference between unplugging the power adapter and using a power button to power off Raspberry Pi. Both of these are improper ways of shutting down.
The second reason is the corrupted image file itself. If you download the image files from the internet there is a chance for corruption of the file during downloading and installation. So, if this is the case, you can try downloading the file again and try. If you still face the same issue, then your Pi is definitely having some other issues.
12. Check the Cabling
This is a simple thing when it comes to troubleshooting your Pi. If you are reading this presumably you might have once checked your cablings as self troubleshooting. Well, that’s good. But you can check once again to confirm things.
Sometimes your Pi may have more than one reason for not booting up. In case you fix one reason, the second reason may be due to improper cabling. So checking once again won’t cost you an arm and leg.
13. Poorly Connected Accessories
The Raspberry Pi won’t boot if there is a poor connection between the Pi and accessories. These are less likely to happen but you have to check it.
There are a handful of obvious reasons to check your accessories. For example, if your screen is switched off, the power supply is not connected, or if there is any loose contact, etc.
Yes, I know you might be smiling. But sometimes it can happen to anyone.
14. Unplug Everything
In case you suspect a hardware issue, then you can try removing almost everything. Unplug things like power supply, sd card, USB, monitor, HATs, etc.
Now, insert an SD card (another one if possible) flashed with the latest version of Raspberry Pi OS. This is to eliminate any probable sd card issues. Then plug the HDMI and power supply.
If your Pi now boots correctly, then the issue arises from something that you didn’t connect to your Pi now. It’s obvious, right? Yes. So the next thing you need to do is to plug each component one-by-one and boot again.
Note: Shut down your Pi properly (using any one of the commands mentioned before) to connect a component and then boot it. Also, remember to plug only one component at a time.
If at one point the Pi doesn’t boot, you have identified the issue, and the same has crept in the last plugged component. You can manually check this item or search for help regarding that.
Just in case, if it doesn’t work, even with the essential components, then the issue is probably within the sd card, power supply, or motherboard. Here also you can check the LED lights to figure out the issue.
Is your Raspberry Pi Dead or Defective? Here’s How to Confirm
If you’ve come this far, and still your Raspberry Pi not booting, there is a high chance that your device is defective.
If you have a Raspberry Pi Pi B, B+, 2B, 3B, or 3B+, then you can check this by removing all the accessories from the Pi and use it with another Pi model (if you have one). If it works with that Pi, then it’s sure that the problem lies in your Pi. If not, the problem is with the accessories. In this context, you can check each one separately to identify the cause.
In the case of Raspberry Pi A, A+, and Zero devices, you can check this by removing all cables, sd cards and connect the device to your Windows PC via USB. If your Pi is ok, the PC will detect it with an alert sound and you can see your Pi listed in the device manager with the name “BCM2708 Boot”.
On a Mac or Linux PC, you can test a Raspberry Pi A or Zero with dmesg command. If it’s working, it will be listed in response to the command.
Still not lucky? Raspberry Pi boards have 12 months warranty, you can once read the terms and conditions before claiming the warranty.
You may also like: How to Dual Boot Raspberry Pi
Conclusion
I sincerely hope by now you got some ideas to troubleshoot your Pi in case of booting problems. There may have other reasons too which are not mentioned in this article. So, if you have any queries or other solutions, then do comment below. That will be useful for other people also.
Found an issue with this article? Report it here, so that I can resolve it.