In today’s article, I’m going to show you how to take screenshots on Raspberry Pi using a few different methods. I’ll also guide you through the procedure to capture screenshots on your Pi remotely over SSH.
This guide is gonna help you if you are working on a project where you will need to take screenshots for documentation, sharing, or tutorials creating purposes.
Although capturing a screenshot on Raspberry Pi is pretty straightforward, the steps may vary depending on the Operating system installed. I’m writing this guide assuming you have the Raspberry Pi OS installed on your device.
So let’s jump right into the process.
If you haven’t set up your Raspberry Pi yet, follow my beginner’s guide to getting started. Once you complete the setup, come back and follow the rest of this guide.
Contents
Requirements
In case you are curious, below is the list of equipment I used to create this Raspberry Pi screengrab tutorial.
- Raspberry Pi
- MicroSD Card
- Power Supply
- Wi-Fi dongle or Ethernet Cable (Recommended)
- Raspberry Case (Optional)
Taking Screenshots Using Scrot
Here we are gonna make use of a software package called Scrot for facilitating the PrintScreen process. This is an incredible piece of software by which you can use commands, hotkeys, and enable shortcuts for taking a screenshot.
- In the latest version of Raspberry Pi OS, Scrot is installed by default. So if you have the Scrot already, then you can skip this installation. Just in case, if you don’t know whether it is installed or not already, you can check it by the following command in a Terminal command window.
scrot - If your Pi responds with a “command not found” message, then you need to install it. For this, issue the below-given command line:
sudo apt-get install scrot - Once installed, you can verify it’s working by issuing the
scrotcommand again. If no error occurs, then you are ready to proceed.
The process of taking a screenshot on Raspberry Pi is not that difficult especially if you have the Scot installed already. Below is a couple of ways by which you can accomplish the task.
1. Using a Keyboard Hotkey
If you have the Scrot installed on your Pi successfully, then your default hotkey for taking screenshots will be the Print Screen key.
You can try this easily by pressing the Print Screen button and then checking the /home/pi directory. If you find there the screenshots taken, then your keyboard hotkey (keyboard shortcut) is working properly.
Also, the screenshot or print screen images will be saved with a suffix _scrot appended at the end of the filename. For example, 2021-06-11-088117_1920x1080_scrot.png
2. Using Terminal Window
This is a piece of cake! You can take a screengrab on your Pi simply by entering the below command:
scrotThat’s it. simple as that.
Taking a Delayed Screenshot
At times when you have the menu open and need to capture a screenshot excluding the menu, the above method is not gonna work. To get a perfect screenshot without the menu, you need to delay the screenshotting for a few seconds. In this way, you can close the menu and wait for the Scrot to trigger the screenshot capture.
To capture this way, just issue a command like below to delay the process for 5 seconds (you can change the time delay in seconds, obviously).
scrot -d 5Other Scrot parameters are:
- scrot -b : To take the border of a window.
- scrot -e : To give a command after capturing a screenshot.
- scrot -h : To display additional help window.
- scrot -t : To create a thumbnail of the screenshot.
- scrot -u : To capture the currently active window.
- scrot -v : To display the current version of Scrot.
Changing Screenshot Saving Location
You may sometimes need to give a custom name and location for the screenshots. You can achieve this by simply adding the exact location and then the custom name and file extension just after the scrot command.
For example, if you want to give raspberryexpert as the name and save it in your downloads folder, you can enter a command like this:
scrot /home/pi/Downloads/raspberryexpert.pngNote: Make sure that you always append the file name with an extension .png
Mapping the Screenshot Command to a Hotkey
If the screenshot command is not a hotkey already, then you will need to map it by editing the configuration file of your Pi and it will come in handy as well.
To add a hotkey you need to declare it in the lxde-pi-rc.xml file. To do this, open the file using this command first.
sudo nano ~/.config/openbox/lxde-pi-rc.xmlI will quickly show you an example of adding the Print hotkey into the xml file. You need the find the <keyboard> tag and add the following lines just below the tag.
<keybind key="print">
<action name="Execute">
<command>scrot</command>
</action>
</keybind>
By adding the above lines, we are mapping the scrot command to the Print screen hotkey on your keyboard.
After successfully adding these lines, save the file by pressing CTRL X , Y and then ENTER.
To reflect the changes you’ve made, type the following command.
openbox -restartHow to Take a Screenshot Remotely over SSH
You may come across some contexts where you find it impractical to take screenshots directly on your Pi. Here you will need to take the screenshot remotely via SSH. In this section, we are going to look into that.
As usual, when you are going to play with the Secure Shell, you need to enable it first. For this, you can refer to my detailed guide about the same:
After enabling SSH, connect using the following command:
ssh <username>@<ip_address>- Now take the screenshot with the below command.
cd ~/Pictures
sudo apt install scrot
DISPLAY=:0 scrot screenshot.png
Skip line 2 in case you have already installed the Scrot.
You can take as many screenshots as you want with different filenames and then transfer them back to your computer by using this command:
scp *.png <pc_username>@<pc_ip_address>Don’t forget to replace the syntax with the correct user and IP address.
Alternatively, from your computer, you can use a file transfer client like Filezilla or any other software that supports SFTP (SSH File Transfer Protocol).
Saving the Screenshot Directly on your Computer
You can take the screenshot on Raspberry pi and save it directly on your Linux computer. But, if you need to take screenshots frequently for any purpose, entering the password each time while connecting to SSH would be a tiresome task. So you can set up no password ssh on your Pi using private or public keys.
Firstly, install maim on your Pi using the below command.
sudo apt install maimNow come back to your PC and capture a screenshot using the following command.
ssh -t <pi_username>@<pi_ip_address> 'DISPLAY=:0 maim' > screenshot.pngRather than other methods here we are using the maim because it’s an elegant method. It outputs the screenshot to stdout which allows us to save the picture to the computer with a simple redirect.
Taking Screenshots Using Raspi2png
Raspi2png is an alternate utility with which you can take a screen capture with ease. To download and install the script., use the following code.
git clone https://github.com/AndrewFromMelbourne/raspi2pngThen, copy it to the /usr/local/bin folder.
sudo cp -a raspi2png/raspi2png /usr/local/binNow, to screengrab enter the below command.
raspi2png -p ~/<directory_name>/screenshot-name.pngMake sure to add your real directory name instead of <directory_name>.
Taking Screenshots Using GNOME Tool
This method is pretty straightforward and easier as we are operating through a graphical user interface.
At first, install the GNOME Screenshot tool using the below command.
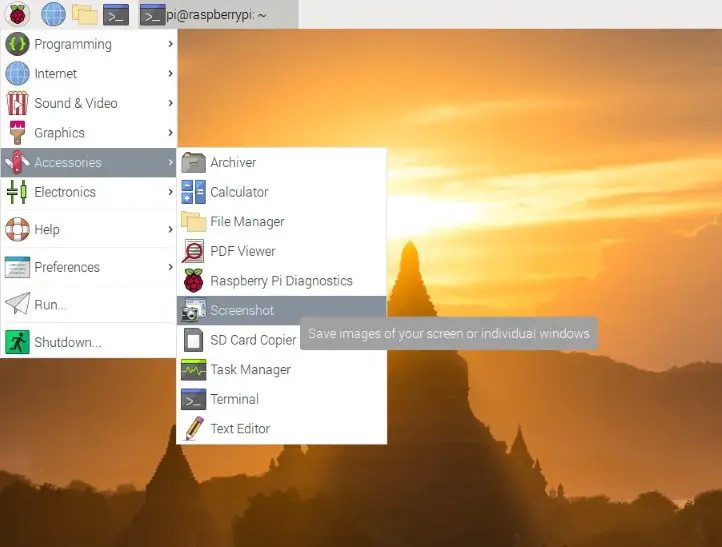
sudo apt install gnome-screenshotOnce installed, click on the Raspberry Pi menu icon followed by Accessories and then Screenshot.
This will open up the GNOME Screenshot window and you can see 3 capturing modes as shown in the screenshot below.
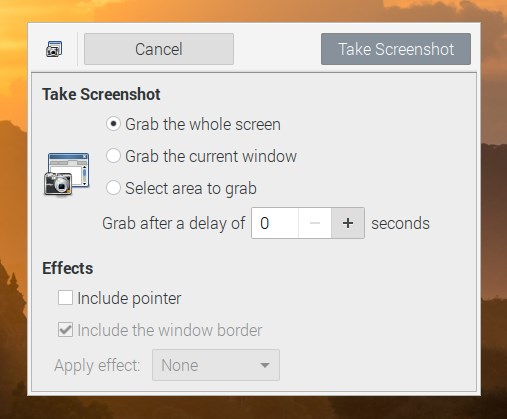
Select the required capturing mode and click Take Screenshot. If you have chosen the third option, you will need to select the area you want to capture using your mouse. By using this option you won’t require an image editor to crop the screenshot image. The first option will capture the entire screen and the second one will grab the current window only.
After taking a print screen or screenshot, GNOME will present you with 2 options. The first one is to simply Save the screenshot and the second one is to Copy to Clipboard. So choose it according to your requirement.
Final Words
So, I hope this guide helped you to understand how to take screenshots on Raspberry Pi. And now onwards taking one will be a piece of cake for you. Isn’t it?
When you have a working hotkey for capturing screenshots you can take the required screenshot within a matter of seconds.
If you mess up with anything or anywhere in the process, just drop a comment. I’ll help you out.
Found an issue with this article? Report it here, so that I can resolve it.