To have a full-fledged experience, you need to SSH into Raspberry Pi. SSH (Secure Shell) is a network communication protocol that enables you to remotely operate your Pi over a secure path. Also, SSH is very useful for copying files and controlling your Pi via commands without moving yourselves into the location of your Pi each time (remote usage). Another advantage of using SSH is that you can use your Raspberry Pi without a dedicated monitor or desktop (ie., headless mode). This allows you to leave the device set up in your desired configuration without worrying about anyone disrupting things.
In this tutorial, I will show you how to SSH into Raspberry Pi on Windows 10, Linux, and Mac OS. First, you have to enable the SSH on your Pi because it will be disabled by default due to security reasons. After that, you can easily SSH into the device.
So without further ado, let begin.
Contents
Equipment
Below given is a list of equipment I used when setting up SSH on my Raspberry Pi.
Recommended
- Raspberry Pi 1 or above
- Micro SD Card
- Ethernet Cord or WiFi Dongle (Pi 3 & 4 has in-built WiFi)
- Power supply
Optional
Prerequisites:
- You should be running Raspberry Pi OS on your Pi.
- Access to a computer with a microSD card reader.
- Necessary admin permission should be enabled.
- An SSH Client. PuTTY for Windows, Terminal in Linux/ Mac OS.
How to Enable SSH on Raspberry Pi
If you are running a Raspbian (now Raspberry Pi OS) version released in late 2016 onwards, SSH access will be disabled by default to improve security. Here I will explain 3 possible methods to enable SSH on Raspberry Pi OS. You can read those methods and find which one is suitable for you.
Method #1: Enable SSH in Headless mode
As I mentioned in the introduction, headless mode means your Pi without having a dedicated monitor, keyboard, or mouse connected to it. In this section, you gonna learn how to enable ssh on a Raspberry Pi in headless mode with a blank boot file.
To do so, you gotta create a blank SSH file on another machine.
- If you have the Raspbian already installed on your Raspberry Pi microSD card, then turn off the device and remove the card.
- Put the microSD card in the card reader and connect it to your computer. Get it recognized on the system.
- Now go to the boot folder (root folder of your SD card). Here the default volume name will be “Boot” when you install the Raspberry Pi OS on your SD card. If you are on a Windows PC, use File Explorer to locate that. On Linux & Mac OS open a terminal and issue the following command.
cd /Volumes/boot - The name of your SD card may be something other than Boot. If so, open the root volume folder and proceed with the following steps.
- Inside the boot volume, create a file without an extension and name it as ssh.
- On Windows, right-click in any white space and select New > Text Document. Now Delete the .txt extension before you save it. In case the File Explorer is not showing the file extensions, click the View tab at the top ribbon and check the File name extensions option in the menu bar as shown in the screenshot below.

- From Mac or Linux, run the following command line while inside the boot directory. This will create a blank ssh file.
touch ssh - Now safely eject the SD card from the computer and mount it on your Pi.
- Turn on the Raspberry Pi.
Now, every time your Pi boots up it will check for the ssh file. Once it finds, it will be executed and the SSH access will be enabled automatically.
Till now if you have done everything right, then you are ready to ssh into your raspberry pi. So let’s move on to that.
Method #2: Enable SSH using GUI Configuration
Half of the headache will be gone if we have a dedicated monitor (desktop) and peripherals connected to our Raspberry Pi. To enable ssh via another method follow the steps below.
- Turn on your Pi and click on the Raspberry logo at the top left corner.
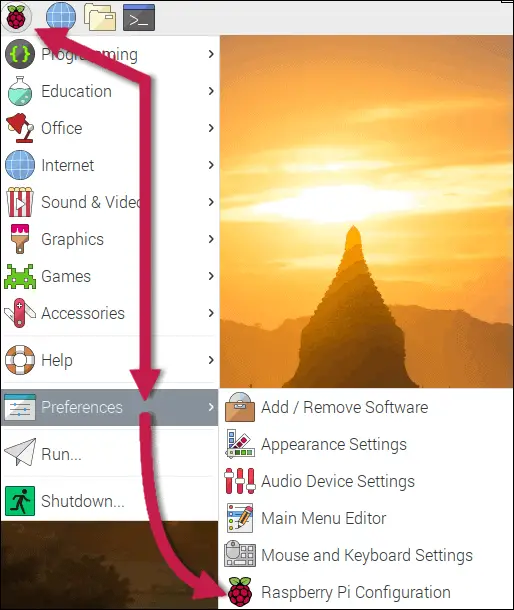
- Now select the Preferences > Raspberry Pi configuration option at the bottom of the nested menu.
- Click on the Interfaces tab and enable SSH and click OK. You’re done!
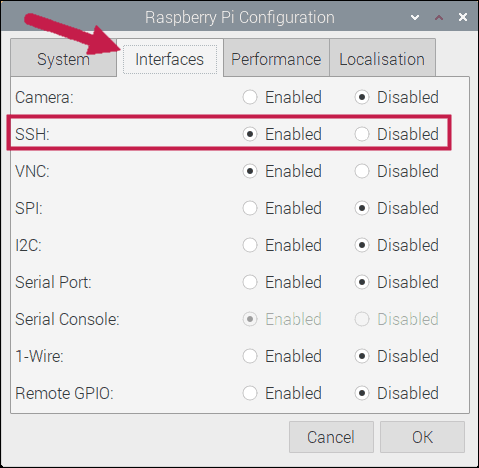
Your Pi will be ready to connect via SSH.
Method #3: Enable SSH via Terminal
By this method, you can enable SSH access with two types of tools viz. raspi-config and systemctl.
Using raspi-config
- Open the Terminal and run the following command.
sudo raspi-config - Once the raspi-config tool loads, select Interfacing options (use arrows on your keyboard to navigate).
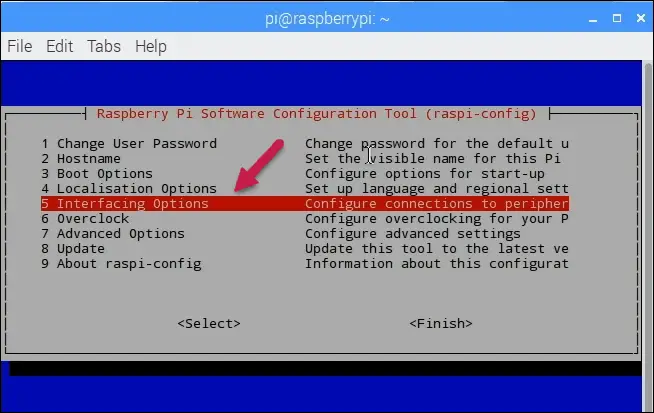
- Similarly, select the P2 SSH option from the next screen.
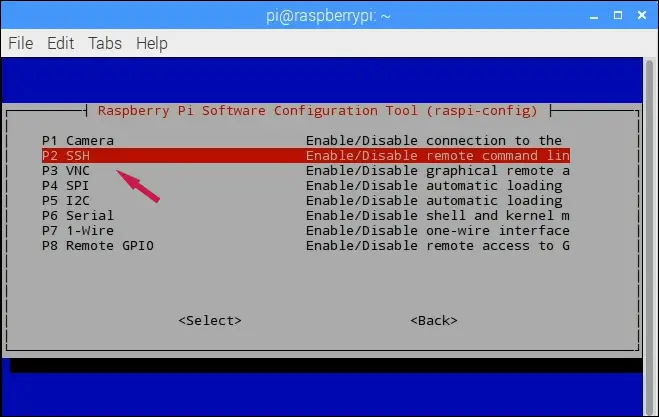
- Select <Yes> once is ask “Would you like the SSH server to be enabled?”
- Now press the Enter button on the confirmation box.
- Come down and select Finish to close raspi-config.
Close the terminal window and now your device is ready to SSH into.
Using systemctl
This is another method to enable SSH. To do with this method, run the following ssh commands in Terminal.
sudo systemctl enable sshsudo systemctl start sshOnce you run the command lines, your device will be ready with ssh enabled and started.
Now it’s time to ssh into your Raspberry Pi. Let’s check how we can do it.
How to SSH into Raspberry Pi
Before you get started you need to find the IP address of your Pi. To find it, run the following host name command in Terminal.
hostname -lNow you will get the Pi’s IP address and note it down.
- For Windows PC, download PuTTy from their official website.
- Launch the tool and fill in the IP address of your Pi. Make sure that you have selected the SSH option and the port is set to 22. The window should look like this:
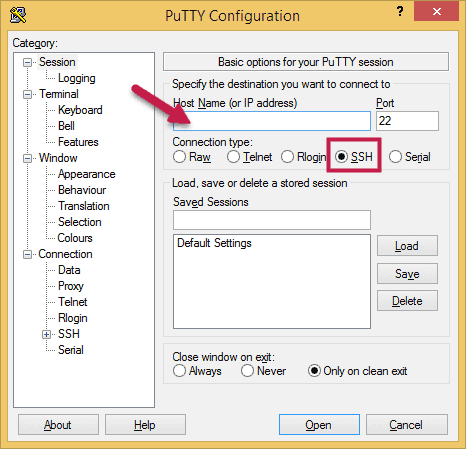
- Click Open to start a new SSH session.
- Now enter your Pi’s username and password (Note that the default username will be pi and the password will be raspberry. If you have changed it, then type the new credentials).
- For Linux and Mac, run the following command in Terminal.
ssh pi@[YOURIPADDRESS]Replace YOURIPADDRESS with your real Pi’s IP address. Then you’re done.
Conclusion
Now you know different methods by which you can ssh into Raspberry Pi. I hope this tutorial solved your query and helped to gain some knowledge.
If you still have any doubts don’t hesitate to comment below. I’ll be more than happy to help you out.:)
Found an issue with this article? Report it here, so that I can resolve it.