Raspberry Pi 4 is undeniably the best single-board computer available today. The heart of the Pi is an ARM Cortex A-72 CPU with a maximum clock speed of 1.5 GHz. A Clock is nothing but an electronic pulse that syncs all other components in a processor and a clock speed of 1.5 GHz means that it updates 1.5 billion times in a second.
But what if I tell you that we can boost its performance even more? That would be nice for most of our applications. Right? Well. Today, I will show you how you can safely overclock Raspberry Pi 4 from its normal 1.5 GHz to a blazing fast 2.147 GHz! And at the end, I’ll also show you how to overclock older versions too.
For your quick knowledge, overclocking is the process of setting a maximum clock speed that is higher than its default and normal rated speed. We can actually overclock both CPU (Central Processing Unit) and GPU (Graphics Processing Unit) for much better performance.
In this tutorial, we are going to overclock the CPU to 2.147 GHz and the GPU to 750 MHz (from its 500 MHz default). These are actually kinds of speeds found on high-end desktop computers.
Contents
Why Overclock your Raspberry Pi?
Overclocking the CPU of your Raspberry Pi will result in increasing the default base speed from 1.5 GHz to 2.147 GHz depending on the cooling solution you provide. To get the most out of your Pi, you need to overclock it as several popular tools will work better when overclocked.
Below are some of the specific benefits you’ll be getting if you overclock Raspberry Pi.
- Retro gaming: Overclocking can significantly improve your retro gaming experience especially if you are running Sony PlayStation 1, Nintendo N64, or Sega Dreamcast games on RetroPie, RecalBox, or any other retro gaming solution you are using.
- Desktop: Don’t you want a bit of additional performance if you use your Pi as a desktop computer? Yes. Overclocking can also help with this.
- Kodi: If you like video streaming, then you can get rid of the performance issues you encounter with the running of Kodi on your Pi. Also, if you are using a VPN, a higher clock speed will always help you.
- ExaGear: If you want to run Windows 10 on your Raspberry Pi, then overclocking can definitely enhance a bit of the performance.
So without further ado, let’s get into the overclocking procedure.
Warning!
Overclocking may crash Raspberry Pi OS (formerly Raspbian) and there is a high chance your microSD card will get corrupted. So make sure that no important data is at risk. I highly recommend taking a full backup of your SD card before proceeding. In case programs start crashing or Raspberry Pi OS refuses to start, you will need to dial back to the default speeds.
Steps to Overclock Raspberry Pi 4
Step 1: Preparation
Before we get started, Let’s check what all things you will need to overclock your Pi 4.
- Raspberry Pi 4
- A cooling Solution
- SD card (installed with Raspberry Pi OS)
- Power Supply (Official one is recommended)
- USB Keyboard (Optional)
- USB Mouse (Optional)
An active cooling solution is very important as your Raspberry Pi 4 can reach insane temperatures of about 80°C or beyond that without even overclocking. Passive cooling will not be enough in such conditions. So while you overclock it, you must need an efficient cooling solution to protect the hardware.

My favorite is GeeekPi’s ICE Tower Cooler. I highly recommend you to get this because it can efficiently reduce the CPU temperature from 80°C to about 40°C. For this to achieve, this fan comes with a tower structure, 5mm copper tube, multi-layer heatsinks, and a 7-blade powerful fan. All the above combination makes it a super radiator for Raspberry Pi.
Step 2: Update your Raspberry Pi 4
In order to get the best performance, you have to update your Raspberry Pi OS with the latest version. The latest version will always have some tweaks to optimize the performance.
- To get it updated open the terminal and issue the following commands one by one.
sudo apt update
sudo apt dist-upgrade- Now reboot your system so that the Raspbian will get restarted. To do so enter this code.
sudo rebootStep 3: Check the Default Speed
Before you proceed with overclocking, just check the current base speed of the CPU. For that enter the following code in the terminal.
cat /sys/devices/system/cpu/cpu0/cpufreq/scaling_cur_freqThis will only return the speed requested by the Kernel. The terminal will most probably return a value of 600000 and this would indicate that your CPU base speed is 600 MHz (or 0.6 GHz).
In case your Raspberry Pi is being throttled due to high CPU temperature or a low voltage, the actual CPU speed may be lower. To know the actual speed issue the following command in the terminal.
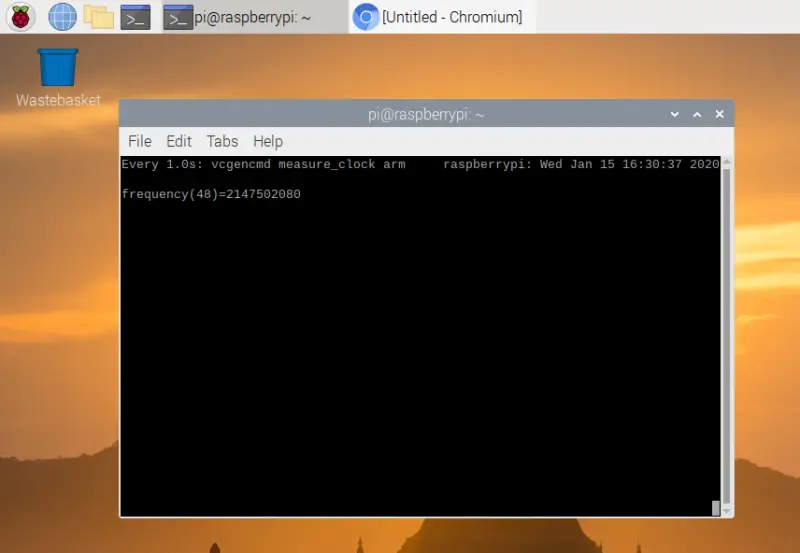
vcgencmd measure_clock armAs you use your Pi, you can see that the speed starts increasing from the requested speed and comes up to its maximum, which is 1500000. To know the speed regularly, instead of entering the command repeatedly you can continuously monitor the speed using the watch command.
watch -n 1 vcgencmd measure_clock armThis keeps you updated with the speed every second. Once you overclock you can see this going beyond 1500000 (or 1.5 GHz).
Step 4: Overclocking the Pi
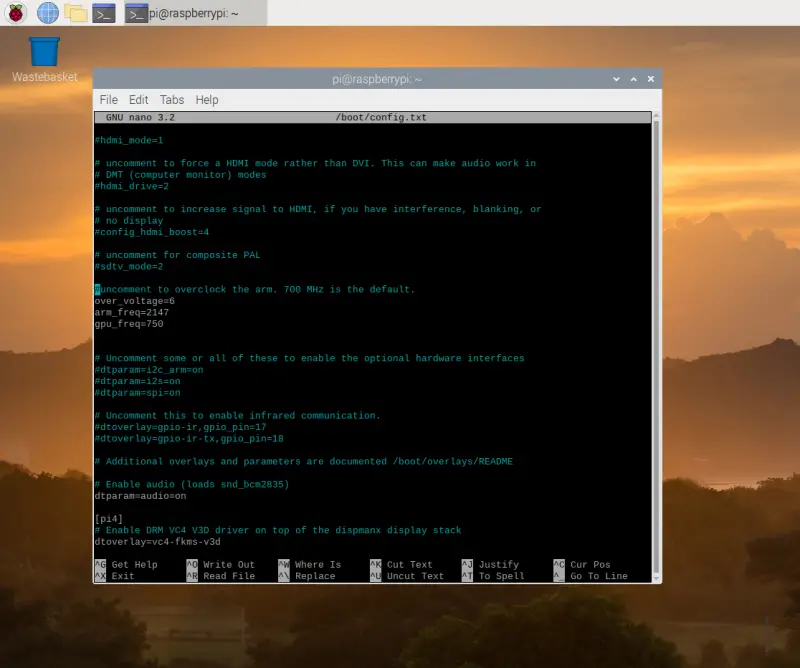
To overclock Raspberry Pi 4, we’ll be tweaking the config.txt file under the core configuration settings. Basically, we are going to set an upper limit for the clock frequency.
- For this, open another terminal window and enter the below code.
sudo nano /boot/config.txt- Now scroll down to the section marked:
#uncomment to overclock the arm. 700 MHz is the default.
#arm_freq=800
And change the config setting to:
#uncomment to overclock the arm. 700 MHz is the default.
over_voltage=2
arm_freq=1750
- Save the file with CTRL+O (press RETURN) and use CTRL+X to exit Nano. Then enter the code to restart your Pi.
sudo reboot- Once your Pi boots up, watch the new and faster clock speed in action:
watch -n 1 vcgencmd measure_clock armCheck your clock speed going up to 1750000 by browsing a few web pages.
Step 5: Overclocking to an even higher Clock Speed (2 GHz)!
So you have overclocked your Pi to 1.75 GHz. It was fun right? Well. Now let’s make it a little bit faster by taking it to a frequency of 2GHz. As before, we are going to edit the config.txt file to take the over_voltage setting to 6 and set the ARM CPU to 2.0GHz. Enter the following command to get it worked.
over_voltage=6
arm_freq=2000- Now reboot your Pi and once it boots up, you’ll be running at 2GHz. You can test it by running the watch command again:
watch -n 1 vcgencmd measure_clock armStep 6: Overclocking to the Max Level (2.147 GHz)!
Now we are going a little bit and we’ll be taking it to the max level of 2.147 GHz. We’ve to edit the config file again and this time we will set the arm_freq to 2147 and gpu_freq to 750 by entering the following code:
over_voltage=6
arm_freq=2147
gpu_freq=750- Save and exit the file by CTRL+O and CTRL+X. Reboot your Raspberry Pi and you can see your device running at a blazing fast speed of 2.147 GHz!
- You can again check the speed using the watch command as we’ve done in step 5.
Note that from testing, it is observed that some Raspberry Pi 4 boards have failed to boot or throttled down due to overheating/ under voltage. Also, it’s not possible to hold your Pi at this maximum speed for a long time. So, I highly recommend you to settle for the arm_freq=2000 or stop at step 5.
How to Recover from a Failed Overclock
Most overclocking problems will show up immediately with a failure to boot up. If you encounter such an issue after overclocking just hold down the SHIFT key while you boot your Pi next time. This will temporarily disable the overclocking and let the Pi boot as normal. Once it boots up, edit the config.txt file (Refer to step 5).
Another way to recover from the overclocking issue is to remove the SD card and plug it into another computer. Open the config.txt file there and adjust the settings.
Can Other Raspberry Pi Models be Overclocked?
Overclocking can also be done on the other models of Raspberry Pi. But you have to take enough precautions to ensure that the device is efficiently cooled and enough power is supplied with a good power supply. I highly recommend you to get the official charger for your Pi as other normal chargers or mobile chargers won’t be able to deliver the required power.
Moreover, always check your model’s default clock speed and be sure not to increase the clock speed by more than 10%.
To overclock older models of Raspberry Pi, everything you need is built into the Raspbian OS. To give you an idea about the same, I’ll quickly show you the case of a Raspberry Pi 2 B. See the screenshots for reference.
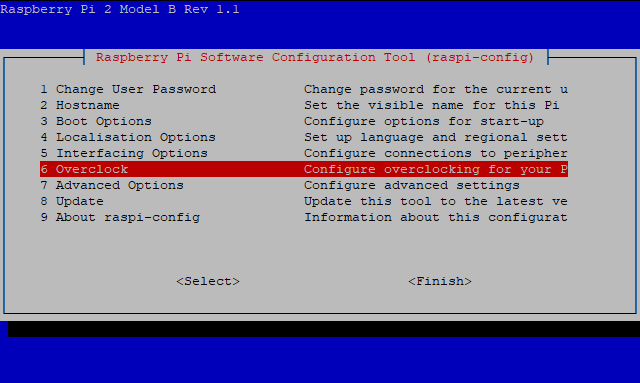
- Open the Configuration tool from the desktop (Preferences > Raspberry Pi Configuration). You can also do it via the command below:
sudo raspi-config - Now choose the Overclock option.
In the next screen, you will see a list of preset options from which you can select the required overclocking option. The currently selected option will be None by default. You will have a list of up to 5 alternatives depending on your Raspberry Pi model.
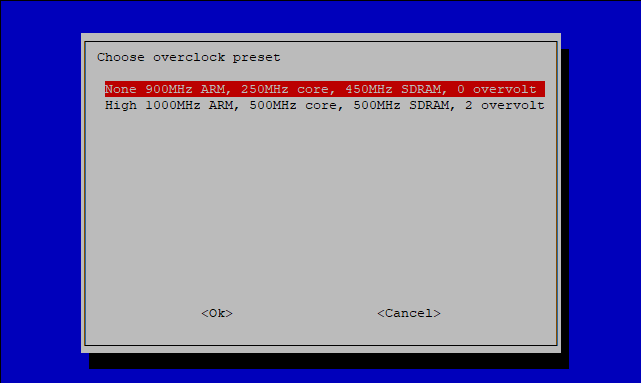
For the sake of this tutorial, I’m using my older Raspberry Pi 2 Model B to demonstrate the overclocking process. In my case, there is only one option other than the default ‘None‘ option.
Now all you need is to select the required option and select OK to apply it.
In case you want to perform a non-standard overclocking with custom values, then try editing the config.txt file and change the value. Make small and careful adjustments in the values (as explained earlier) and test the results. If anything goes wrong refer to the above section on how to recover from a failed overclock.
Final Words
My friends, I hope now you’ve gained some knowledge about overclocking and how to do it on your Raspberry Pi. I tried my level best to explain things clearly and in simple words. If you still find difficulty in overclocking your Pi don’t hesitate to ask me. Just drop a comment below. I’ll be happy to help you out.
Also, don’t forget to share your experience with overclocking your Pi and let me know which was the model and how it worked for you.
Found an issue with this article? Report it here, so that I can resolve it.